Tutu’s Tex-Mex Mac and Cheese

If I had to choose an absolute favorite dish that my Tutu used to make, it would either be her famous lasagne or this Tex-Mex Mac & Cheese. It’s made up of delicious layers of pasta, spicy pork sausage, green chiles, and cheese, all topped with fresh tomatoes and cilantro.

Continue reading

Baked Ziti Pasta

Every Sunday, all of my family (cousins and grandparents included) get together for dinner. We have this family tradition where we play Mahjong and TienGow together, so there’s no time for fussing in the kitchen to make dinner. This recipe is great because it can be prepared ahead of time and thrown in the oven when the family arrives.

Continue reading

Chinese Rice Porridge (Jook)

Many Asian cultures have their own version of rice porridge – the Korean juk, mandarin congee, and Japanese oyaku. Growing up in a Cantonese family, I always knew it as jook. Jook is one of my Popo’s (grandma’s) favorite dishes and was ALWAYS something that my dad would cook up when anyone was sick.

This jook recipe is thick and hearty and flavored with ginger, chicken, and green onions. It’s extremely easy to cook and I find that it makes an exceptionally great dish when it’s either cold outside or I am feeling under the weather.

Continue reading

Corn Chowder with Green Chiles

This corn chowder is not your average-joe recipe. It doesn’t have the crumbly bacon, but by no means is it lacking in flavor. What I love about this recipe is that you really taste the corn (which happens to be my favorite part…I mean it is called CORN chowder right?) and also has a spicy little kick from the hatch green chiles. This recipe is so simple and might be one of the easiest pantry recipes to date!

Serving Size: 4 -6 Servings

Ingredients:

  • 2 tbsp vegetable oil
  • 1 large white onion, chopped
  • 3 cloves of garlic, minced
  • 2 cups vegetable broth
  • 1 cup milk (2% or whole)
  • 1 (15oz) cans creamed corn
  • 1 (15oz) can whole kernel corn
  • 1 (4oz) can Hatch green chiles
  • 2 medium potatoes (red, russet, or yukon) – about 3 cups diced into  1-in cubes
  • 2 teaspoon salt
  • 1 teaspoon ground black pepper
  • Green onions and shredded mozzarella, for serving

Directions:

  1. Heat the oil in a large pot. Add the garlic and onion and cook over medium high heat until the onion is softened. 
  2. Pour the vegetable broth, milk, and both cans of corn into the pot. Cook and stir 5 minutes.
  3. Add the potatoes and season with salt and pepper. Bring to a boil, reduce heat to low, and cover pot. Simmer 20 minutes, stirring frequently, until potatoes are tender.
  4. Ladle the chowder into individual bowls, top with mozzarella cheese and green onions, and serve hot!

English Muffins

English Muffin

Recipe adapted from TheKitchen

Servings: 12 Muffins

Ingredients:

For the dough starter:

  • 3/4 cup (3 1/3 ounces) all-purpose flour or bread flour
  • 1/2 cup water
  • 1/2 teaspoon active dry yeast (or 2 tbsp active sourdough starter)

For the English muffin dough:

  • 1 cup milk (whole or 2%)
  • 1 teaspoon active dry or instant yeast
  • 2 tablespoons sugar
  • 2 tablespoons unsalted butter, melted
  • 1 teaspoon salt
  • 3 to 3 1/4 cups (13 1/2 to 14 1/2 ounces) all-purpose flour or bread flour
  • Cornmeal for dusting
  • Butter for the skillet

Directions:

Prep Work (Night-Before):

  1. Make the dough starter: Mix the flour, water, and yeast for the starter in a small mixing bowl. Beat until the batter is smooth and well combined.
  2. Let the starter sit 1 to 12 hours: Cover the starter and place it in the fridge at least overnight or for up to 24 hours. For quicker muffins, let the dough rise at room temperature until doubled in size, about 1 1/2 to 2 hours. The starter will become increasingly bubbly the longer it sits and will double in bulk. The longer you can let the starter ferment, the better the flavor and structure of your finished English muffins.

Day of baking 

  1. Whisk together the water, yeast, and starter: In the bowl of a stand mixer or large mixing bowl, combine the milk and yeast for the dough. Scrape the starter into the bowl and use a whisk to break it up and dissolve it into the milk. It should become quite frothy.
  2. Mix the dough together: Add the sugar, butter, and salt to the bowl and whisk to combine. Add 3 cups of the flour and stir with a stiff spatula until you form a shaggy, floury dough.
  3. Knead the dough: With a dough hook on a stand mixer, knead the dough until it comes together in a smooth ball, 5 to 8 minutes. Alternatively, knead by hand against the counter. If the dough is very sticky like bubble gum, add extra flour as needed, but err on the side of caution. The dough is ready when it forms into a smooth ball and springs back when poked; it will feel slightly tacky to the touch, but shouldn’t stick to the bowl or your hands.
  4. Let the dough rise overnight in the fridge: Transfer the dough to a large bowl lightly filmed with oil. Cover and place in the fridge overnight or for up to 3 days.
  5. Divide and shape the muffins: Turn the risen dough out onto a lightly floured work surface. Use a pastry scraper to divide the dough into 12 equal pieces. Roll each piece gently against the counter to shape into smooth, round balls.
  6. Transfer the muffins to a baking sheet to rise: Scatter cornmeal generously over a baking sheet and arrange the balls on top, spaced a little apart. If you have muffin rings, place them around the balls at this point. Sprinkle the tops of the balls with more cornmeal.
  7. Let the muffins rise until puffy: For dough that was refrigerated, this will take 1 1/2 to 2 hours; for room temperature dough, this will take about 1 hour. Depending on the size of your muffin rings, the muffins may not totally fill the rings — that’s okay.
  8. Warm a skillet: When ready to cook the muffins, warm a large skillet over medium heat. Melt a small pat of butter — enough to just coat the bottom of the pan and prevent sticking.
  9. Cook the muffins 5 to 6 minutes on one side: Working in batches, transfer a few of the muffins to the skillet — allow an inch or so of space between muffins and do not crowd the pan. If using rings, transfer the muffins with their rings to the pan. Cook until the bottoms of the muffins are golden brown, 5 to 6 minutes.Version 2
  10. Flip and cook 5 to 6 minutes on the other side: Flip the muffins and cook the other side until golden brown, 5 to 6 minutes. If you prefer thinner, less puffy English muffins, you can gently press the tops with the spatula to prevent them from rising too much.
  11. Adjust the heat as needed: If your muffins seem to be browning too quickly on the bottoms (or not quickly enough), adjust the heat as needed. (If you find that your muffins are browning too quickly, throw them in the oven at 350°F to finish baking through.)
  12. Finish cooking all of the muffins: Transfer cooked muffins to a cooling rack. Continue working in batches until all the muffins have been cooked. Add a small pat of butter to the pan between batches to prevent sticking.
  13. Split and serve! Split the English muffins with a fork, spread with butter or jam (or both!), and eat. English muffins will keep for several days in an airtight container on the counter and are fantastic warmed in the toaster oven. Fresh English muffins can also be wrapped tightly in plastic wrap or aluminum foil, and kept frozen for up to 3 months.

Creamy Parmesan Mashed Potatoes

Happy Saint Patricks Day everyone!! Today is day FOUR of my special week of recipes that feature the KitchenAid Stand Mixer. My tutu (grandma) used to make us a classic St. Patricks Day dinner with corned beef and the works. She would always make a double batch of her delicious mashed potatoes because she knew that they were my favorite part of the meal! So today we’ll be whipping up some delicious creamy, and cheesy mashed potatoes to complete our St. Patty’s Day inspired dinner!


Servings: 4 Servings

Ingredients:

Mashed Potatoes

  • 2lb russet potatoes, peeled and cubed
  • 1/2 – 1 cup whole or 2% milk (do not use skim, 1%, soy, or nut milk)
  • 3 tbsp butter
  • 1/2 cup shredded Parmesan cheese
  • Salt and pepper, to taste

Serve with:

  • Corned Beef
  • Steamed Cabbage & Carrots

Directions:

  1. Place the cubed potatoes in a medium pot and fill the pot with enough water to just cover the potatoes. Bring the water to a gentle boil and cook until tender, about fifteen minutes. The potatoes will be done when you can easily cut through the flesh of the potato with a knife.
  2. When the potatoes are done, drain the water (or reserve the water for a soup thickener, breads, etc) and pour the hot potatoes in the bowl of the stand mixer. Immediately add the butter and let it sit for about two minutes. This step allows the butter to melt as well as let some of the steam escape from the potatoes, allowing them to have a “fluffy” texture.
  3. Using the flat beater attachment, mix on low (speed 1 or 2) and slowly pour in the Parmesan cheese. Gradually add the milk until the potato mixture reaches your desired consistency. Add salt and pepper to taste.
  4. Serve warm with Corned Beef and Cabbage for a classic St. Patty’s Day Dinner!


Chinese Dumplings

Happy Chinese New Year! Gong Xi Fa Cai! Gong Hee Fat Choy! Xin Nian Kuai Le! However you say it, happy year of the monkey everyone!

The new year has brought a lot of new adventures, and I couldn’t be more excited to be living in San Francisco! The city is booming with hundreds of restaurant and food options. In particular, San Francisco is known for having one of the best and largest Chinatowns in the U.S. and I couldn’t be more excited to get my hands on some dim sum and Chinese baked goods.

Continue reading

Oatmeal Chocolate Chip Cookies

Cooking is all about making meals that taste the way that you like them, right? Add a little more garlic, a little less salt, swap a little butter for olive oil. Whatever it may be, cooking is flexible. Baking on the other hand, is a science. What’s the difference between baking soda and baking powder? Why do some recipes call for one and not the other, while some recipes call for both?!

I realized this dilemma when I was on the search for the ultimate oatmeal chocolate chip recipe. Of course when I searched for a recipe on Google, I came up with hundreds of recipes that were everyone’s “ultimate” cookie recipes. But how do I know if these recipes are the way I like to eat chocolate chip cookies?

So if I didn’t think I was enough of a nerd before, I definitely outdid myself this time. I just spent an hour on The Food Lab blog reading about the science behind baking chocolate chip cookies. No joke. J. Kenji Lopex-Alt is the man when it comes to cookies. I mean he tested everything from chocolate temperature to creamed vs. melted butter to brown vs. white sugar. I mean 100 experiments, 32 pounds of flour, and 1,563 cookies later – he’s covered everything.

oatmealchocolatechipcookie

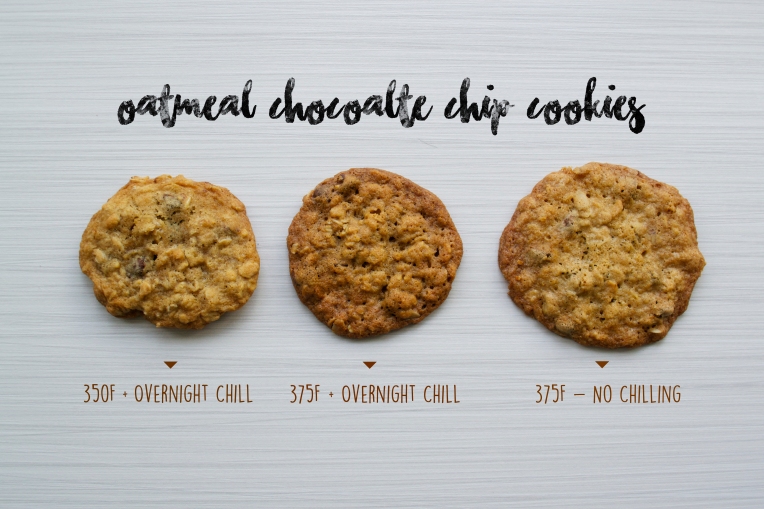
I did a little (and much simpler) experiment myself and here are the results! So, a little disclaimer, my favorite cookie is the one on the far right. You can see that not chilling the dough makes a little flatter and crisper cookie.

Servings: Makes 2-3 dozen cookies

Ingredients:

  • 2 sticks unsalted butter
  • 1 ice cube
  • 2 cups all-purpose flour
  • 3/4 teaspoon baking soda
  • 1 teaspoons salt
  • 3/4 cup granulated sugar
  • 2 large eggs
  • 2 teaspoons vanilla extract
  • About 1/2 cup dark brown sugar
  • 8 ounces semi-sweet chocolate, roughly chopped with a knife into chunks
  • Coarse sea salt for garnish

Directions:

  1. Melt butter in a medium saucepan over medium-high heat. Cook, gently swirling pan constantly, until particles begin to turn golden brown and butter smells nutty, about 5 minutes. Remove from heat and continue swirling the pan until the butter is a rich brown, about 15 seconds longer. Transfer to a medium bowl, whisk in the ice cube, transfer to the refrigerator, and allow to cool completely, about 20 minutes, whisking occasionally. (Alternatively, whisk over an ice bath to hasten process).

  2. Meanwhile, whisk together flour, baking soda, and salt in a large bowl. Place granulated sugar, eggs, and vanilla extract in the bowl of a stand mixer fitted with the whisk attachment. Whisk on medium-high speed until mixture is pale brownish-yellow and falls off the whisk in thick ribbons when lifted, about 5 minutes.

  3. Fit the paddle attachment onto the mixer. When brown butter mixture has cooled (it should be just starting to turn opaque again and firm around the edges), Add brown sugar and cooled brown butter to egg mixture in the stand mixer. Mix on medium speed to combine, about 15 seconds. Add flour mixture and mix on low speed until just barely combined but some dry flour still remains, about 15 seconds. Add chocolate and mix on low until dough comes together, about 15 seconds longer.

  4. **If you prefer softer, chewier cookies, then transfer to an airtight container and refrigerate dough at least an hour or up to three days.**

  5. When ready to bake, adjust oven racks to upper and lower-middle positions and preheat oven to 325°F. Using a 1-ounce ice cream scoop or a spoon, place scoops of cookie dough onto a non-stick or parchment-lined baking sheet. Each ball should measure approximately 3 tablespoons in volume and you should be able to fit 6 to 8 balls on each sheet. Transfer to oven and bake until golden brown around edges but still soft, 13 to 16 minutes, rotating pans 180 degrees half way through baking.

  6. Remove baking sheets from oven. While cookies are still hot, sprinkle very lightly with coarse salt and gently press it down to embed. Let cool for 2 minutes, then transfer cookies to a wire rack to cool completely.

  7. Repeat steps 3 and 4 for remaining cookie dough. Allow cookies to cool completely before storing in an airtight container, plastic bag, or cookie jar at room temperature for up to 5 days.

Hearty Lentil Soup

Some of the best recipes that I’ve tried no doubt are the ones that have been passed down from family and friends. Tried and true, used over and over for generations, these recipes always use a lot of precision with terms like “lots” and “about.” But that’s really why cooking is so amazing, because at the end of the day no recipe is perfect, but it can be perfectly yours. You get to decide to “add as much as you like” and “cook for a while” until it becomes a dish that is just the way that you want it to be.

It’s no secret that one of the things that I love to do most is cook. But to be completely honest, I love to spend time cooking with family and friends. The first time I tried this soup was in college with Ben. It was about February and I think he was secretly hoping for some cooler weather, but in Los Angeles, that’s just usually not the case. His mom had e-mailed him this lentil soup recipe and he was eager to try it – and she was right, half the fun is making it with others.

She warned us that we should give ourselves about two and a half hours from start to finish if we wanted a “not rushed” soup, but it’s worth the wait. I should also warn you that it makes enough to feed an army, which is good because the wonderful smell permeated the entire apartment and Ben’s roommates were more then happy to volunteer as “testers.”


Ingredients:

  • ½ stick of butter
  • 1 lb bacon
  • 1 large onion, diced
  • 1 head (or about 8 cloves) of garlic
  • 6 carrots, sliced
  • 6 medium potatoes, cubed
  • 2 lbs of beef sausage, sliced
  • 1+1/2 bags of dry lentils
  • 8 cubes of beef bouillon


Directions:

  1. Start with one large soup pot. Melt about a half stick of butter.  Be sure to not let the heat get too high or all will eventually burn.
  2. Fry about 1 lb of bacon ’til almost crisp. Drain fat.  (I use an old juice can and stick the drained fat in the freezer.)
  3. Add to the bacon one large onion, diced.
  4. Add as much garlic as you’d like.  Use a garlic press to add them to the mix.
  5. Add to the above about six carrots and six medium potatoes.
  6. Let all the above ingredients cook together for a while.
  7. Add lots–about two pounds–of beef sausage, cut into bite-sized pieces.
  8. Add water to about 2/3 to the top.
  9. Add about 1-1/2 bags of lentils
  10. The soup needs to come to a boil and stay there for about 15 minutes.  This will soften the lentils and merge the flavors.
  11. Once all the ingredients have cooked together for about a half-hour to an hour, add about 8 cubes of beef bouillon (more or less according to taste).
  12. Add salt and pepper. (I always wait to season the broth after the flavors have had time to meld so as not to over-salt/over-season it).

Southern Buttermilk Biscuits

This is probably one of the simplest recipes that I have found and there really are only two rules to making great biscuits. Rule #1: don’t over work the dough (the less you handle it, the fluffier they come out).  Rule #2: Make sure you have cold butter, like really cold butter. That’s all! Don’t you wish that every recipe was this fool proof? If you though it couldn’t get any better, then you’ll be happy to hear that this recipe can even be made ahead of time! This buttermilk biscuit recipe might just be the perfect time-saving recipe that everyone will enjoy this Christmas!


Servings: 10 Biscuits

Ingredients:

  • 2 cups all-purpose flour (+ extra for dusting)
  • 1/4 tsp baking soda
  • 1 tbsp baking powder
  • 1 tsp salt
  • 6 tbsp unsalted butter very cold
  • 1 cup buttermilk OR 1 cup milk +1 tbsp lemon juice
  • ½ cup sugar (optional for topping)

Prep Work:

  1. Cut the butter into 1 tbsp sized pieces and place on a sheet of parchment paper in the freezer.

Directions:

  1. Preheat the oven to 450F.
  2. Combine the dry ingredients in the bowl of a food processor. Add the chunks of cold butter and pulse a few times until the flour resembles a coarse meal.
  3. Add the buttermilk and pulse until just combined (remember Rule #1!) Note: It should be very wet so if it appears to be a bit on the dry side, then add a splash of buttermilk.
  4. Sprinkle some flour on a cutting board (or clean kitchen counter) and transfer the dough from the food processor onto your workspace.
  5. Using your hands, gently PAT (do not use a rolling pin *cough *cough Rule #1 again….) the dough out until it is about 1/2″ thick. Fold the dough over itself about four or five times and gently press down until it is about 1 inch thick. Folding the dough will create nice air pockets for your bread to have flaky layers.
  6. Use a round cutter to cut out each biscuit and place the biscuits on a cookie sheet. You can gently knead the scraps together and make a few more, but they will not be anywhere near as good as the first ones. If you like your biscuits to have soft sides, then place them so they touch each other. If you like crusty sides, then place them about 1 inch from each other.
  7. Bake for about 10-12 minutes- the biscuits will be a beautiful light golden brown on top and bottom.

Note: In a time crunch? You can make these biscuits, cut them, put them on cookie sheets and freeze them for up to a month. When you want fresh biscuits, simply place them frozen on the cookie sheet and bake at 450°F for about 20 minutes.

Halloween Cream-Filled Cookies

Looking to make a festive Halloween treat? These cookies are a fun homemade version of the classic Oreo cookie and today they get a little festive with some orange frosting! Happy Halloween!

cookies

Serves: About 20 cookies
Ingredients:
Oreo COokie:
  • 1 + 1/4 cups All-purpose flour
  • 1/2 cup unsweetened natural cocoa powder
  • 1 teaspoon baking soda
  • 1/8 teaspoon salt
  • 1/2 cup unsalted butter, softened to room temperature
  • 3/4 cup granulated sugar
  • 1/4 cup packed light brown sugar
  • 1 large egg, at room temperature
  • 1 teaspoon vanilla extract
Cream Filling:
  • 1/4 cup unsalted butter, softened to room temperature
  • 1/4 cup vegetable shortening, room temperature
  • 1 + 3/4 cups confectioners’ sugar
  • 1 teaspoon vanilla extract
  • Food coloring (optional)
Directions:
  1. Be sure to remove the butter and egg from the refrigerator and bring both to room temperature. It is really important that the butter be at room temperature because if it is too cold, then it won’t cream properly later on!
  2. Make the cookies: In a medium bowl, mix together the flour, cocoa powder, baking soda, and salt. Set aside.
  3. In a separate large bowl, use an electric handheld or stand mixer to beat the butter on high speed until creamy (about 1 minute). Scrape down the sides of the bowl, if needed. Switch the mixer to medium speed and add both the granulated and brown sugar until combined. Here’s a quick how-to if you’ve never creamed butter and sugar together. Beat in the egg and vanilla extract until just combined. Turn the mixer off.
  4. Gradually add the dry ingredients (1 cup at a time) to the wet ingredient mixture and mix on low until all of the dry ingredients have been combined and a dough is formed. Take the dough and gently roll in on the counter to form a ball. Place the dough back into the bowl, cover with plastic wrap, and chill for 30 minutes. Sorry, chilling is mandatory.
  5. Preheat oven to 350F degrees. Remove the cookie dough from the refrigerator. Line two large baking sheets with parchment paper or silicone baking mats. Set aside.
  6. Roll the dough into small balls (about 2 teaspoons of slightly chilled dough per ball) and place 12 on each baking sheet. Press down on the balls to flatten slightly and bake each batch for 6-8 minutes. These cookies are small and bake very quickly and they will appear soft when done. Remove from the oven and allow to cool for at least 5 minutes on the baking sheet before transferring to a wire rack to cool completely. Repeat until all of the cookie dough has been used (or eaten!).
  7. Make the cream filling: In a small bowl using a handheld or stand mixer, beat the butter and shortening together on high speed until creamy and combined (about 1 minute). Turn the mixer off and add the confectioners’ sugar and vanilla. If you wish to have a festive orange cream filling, then also add a few drops of red and yellow food coloring. Beat on low for 1 minute and then switch to high and beat for 1 more minute until creamy and combined. The cream filling is thick.
  8. Carefully spoon the filling into a quart-sized ziploc bag. Here’s a quick how-to video that shows how easy it is to make and use your own pastry bag! Pipe the cream filling between two cooled chocolate cookies. Repeat with the rest.

Cookies stay fresh covered at room temperature for up to 1 week. Cookies freeze well, up to 2 months. Cream filling may be made ahead of time (up to 2 days in advance). Cover and chill when storing. Allow to come to room temperature before using.

Banana Nutella Crepes

DSC_0480 - Version 2
The first time I had this crepe was in Paris while I was studying abroad. I ordered this banana and Nutella crepe as a snack and absolutely loved it! Although I don’t have a fancy crepe pan like they do in Paris, I’ve found that a large frying pan is all that you really need! Everyone in my family loves these crepes, especially with Nutella and banana. This is another great recipe for a Sunday morning breakfast because the batter can even be made the night before!

Continue reading

Chashu Pork

chashu-pork
 
Serves: 4 (as ramen topping or side dish)

Ingredients

  • 1 lb. pork shoulder
  • 1 tsp. salt
  • ½ Tbsp. oil
  • 2-inch ginger, sliced
  • 4 green onions
  • ⅔ cup water
  • ⅓ cup white rice wine vinegar
  • ⅓ cup soy sauce
  • 3 Tbsp. sugar

Kitchen Tools:

  • Cast Iron Skillet or Medium Frying pan
  • Otoshibuta (Learn how to make an Otoshibuta out of aluminum foil  here)

Directions:

  1. Cut the tips off of the green onions. Then cut into 2-inch lengths (separating the white and green parts). Set the green parts aside for later.
  2. Peel and slice the ginger.
  3. Sprinkle and rub the salt on the pork shoulder.
  4. Heat the oil in a cast iron skillet (or regular frying pan) over high heat and brown the fat side first, then flip over to brown the other side. It should take about 10 minutes.
  5. While the meat is browning, put the water, rice wine vinegar, soy sauce, and sugar in a pot (large enough so that the entire piece of pork shoulder can fit).
  6. Place the pork belly in the pot and add ginger and green onions and bring it to a boil.
  7. Place an Otoshibuta on top of the meat. Do not use a regular lid!
  8. Reduce the heat to medium-low and simmer, occasionally turning the meat for about one hour or until there is 1/4 inch liquid left in the pot.
  9. Remove the otoshibuta and reduce the sauce until you can see the bottom of the pot when you scrape the sauce. After about 15­-20 minutes or so, bubbles start to appear. You are getting close to the end. Turn off the heat when the sauce is now thickened and meat is shiny.
  10. Remove the meat and cut into thin slices.
The chashu can be stored it an airtight container in the refrigerator up to 5 days and 3 weeks in the freezer.

White Chocolate Macadamia Nut Cookies

WhiteChocolateMacNut
Servings: Makes 3-4 dozen cookies
Ingredients:
  • 1 cup (2 sticks) butter, softened
  • 3/4 cup granulated sugar
  • 1 cup packed light brown sugar
  • 2 teaspoons vanilla extract
  • 2 large eggs
  • 3 cups all-purpose flour
  • 3/4 teaspoon salt
  • 1 teaspoon baking soda
  • 12 ounces white chocolate chips
  • 1 cup macadamia nuts, coarsely chopped
Directions:
  1. Preheat the oven to 350 degrees F.
  2. In a large bowl, beat together the butter, granulated sugar and brown sugar with a handheld mixer (or in the bowl of a stand mixer) until the mixture is well-combined.
  3. Add the vanilla and eggs and beat until the mixture is creamy and light in color, 2-3 minutes.
  4. Stir in the flour, salt and soda and mix until just combined; a few streaks of flour remaining are ok.
  5. Add the white chocolate chips and macadamia nuts and mix until combined and no streaks of flour remain.
  6. Roll tablespoon (or slightly larger) size balls of dough and place on silpat or parchment lined baking sheets, 1 to 2 inches apart.
  7. Bake for 9-12 minutes.